|
 When grading a diamond, the following equipment is used: tweezers, a loupe, a standard white light source (lamp), an ultraviolet lamp with the radiation wavelength of 254 nm (S.W. UV light) and 365 nm (L.W. UV light), a gauge, a set of color master stones, a gemological microscope, a balance, standard white paper, a cleaning liquid, and a wiping tissue. When grading a diamond, the following equipment is used: tweezers, a loupe, a standard white light source (lamp), an ultraviolet lamp with the radiation wavelength of 254 nm (S.W. UV light) and 365 nm (L.W. UV light), a gauge, a set of color master stones, a gemological microscope, a balance, standard white paper, a cleaning liquid, and a wiping tissue.
Before examining a diamond, it is necessary to clean its surface. For this purpose, the stone is washed with alcohol, wiped with a special tissue, or boiled in an acid.
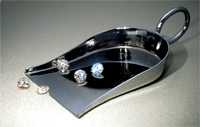
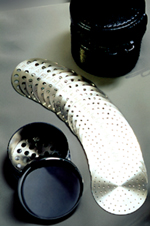
In addition, to identify cut diamonds and distinguishing them from imitations, synthetics, and treated diamonds, the following gemological equipment is used: refractometers, polariscopes, balances with hydrostatic weighing option, spectroscopes, conoscopes, duotesters, immersion microscopes, magnets. Also, diamond diagnostics may use more complex laboratory methods, such as ultraviolet/visible-range/infrared spectroscopy, cathodoluminescence (color and spectral), spectroscopy of electron paramagnetic resonance. To sort diamonds, a shovel and a sorting tray are used.
 Means for cleaning gemstones
 |
A cut gemstone to identify should have a clean surface. It is possible to clean the stone with a soft material wetted with alcohol, washing liquid, acid mixture, or another solvent. An ultrasonic bath can be also used for this purpose. If necessary, the cleaning procedure can be repeated a few times. To avoid soiling the gem, it is recommended to take it with tweezers after cleaning. If the stone is weakly soiled, it is enough to wipe it with a dry pileless rag.
The following means are used to clean the samples to diagnose:
- Napkins and pileless rags.
- Cleaning liquids (alcohol, various solvents, washing liquids, acids).
- Ultrasonic bath.
Cleaning a gemstone with a napkin or a pileless rag:
- If the stone is heavily soiled, treat it with alcohol, solvent, or washing liquid before cleaning. To avoid wetting the cleaning napkin, carefully remove all the liquid from the stone with another napkin.
- Fold the cleaning napkin so that to make its working surface the inner one.
- Bend the napkin to uncover a portion of its inner surface and place the stone there (manually or by means of tweezers). Then, unbend the napkin to hide the gem inside.
- Move the stone throughout the fold of the napkin (manually or by means of tweezers) for one or two minutes. The duration of this procedure depends on the pollution degree of the stone.
- Take the cleaned gemstone with tweezers only.
|
 Shovel
 |
|
|
|
Sorting
tray |
|
|
|
Tweezer |
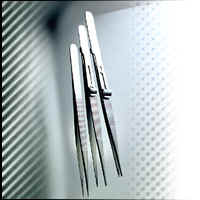 There
are various kinds of tweezers. Black tweezers are recommended
for grading in order to avoid reflections inside a stone.
The tweezers should be soft enough. Tweezers differ in length,
thickness of ends (lips), and hatching on them. Tweezers with
clips are also used. Figure shows
how a stone can be held with tweezers. A stone should be held
close to the tips of tweezers, otherwise reflections of the
tweezers may appear inside the stone. The tweezers should
be held with a minimal effort, just sufficient for fixing
a stone. Overpressing on tweezer's lips can result in "shooting"
a stone from the tweezers. The tweezers should be held without
tension. A stone can be tilted or rotated together with the
tweezers for successive examination of all its zones from
different sides. There
are various kinds of tweezers. Black tweezers are recommended
for grading in order to avoid reflections inside a stone.
The tweezers should be soft enough. Tweezers differ in length,
thickness of ends (lips), and hatching on them. Tweezers with
clips are also used. Figure shows
how a stone can be held with tweezers. A stone should be held
close to the tips of tweezers, otherwise reflections of the
tweezers may appear inside the stone. The tweezers should
be held with a minimal effort, just sufficient for fixing
a stone. Overpressing on tweezer's lips can result in "shooting"
a stone from the tweezers. The tweezers should be held without
tension. A stone can be tilted or rotated together with the
tweezers for successive examination of all its zones from
different sides.
|
|
Loupe |
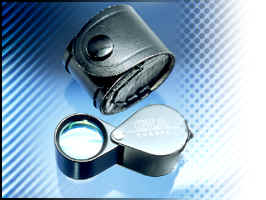 Gemologists
use triplet-type,
10 X loupes, without distortion of colors and image throughout
the vision field (achromatic-aplanatic lens), 18-20.5 mm in
diameter. Loupes with black frames are preferred. Loupes with
tenfold magnification and a measuring scale are used for the
estimation of linear dimensions of a stone. When a diamond
is examined with a loupe, it is important to provide a proper
position of a stone held with tweezers relative the light
source and the "loupe eye". The light source is set
opposite the eye above the table approximately at or slightly
below the eye level and is orientated so that the direct light
falls on the stone but does not strike the eye. The loupe
is fixed by the right hand at the right eye, with its frame
touching the eyebrow. A stone is held with tweezers at a distance
of about 5 cm in front of the loupe, so that the specimen
is in focus and in the center of the field of vision. Both
hands should be in a contact with each other to avoid trembling
of the loupe or stone. The elbows may be placed on the table. Gemologists
use triplet-type,
10 X loupes, without distortion of colors and image throughout
the vision field (achromatic-aplanatic lens), 18-20.5 mm in
diameter. Loupes with black frames are preferred. Loupes with
tenfold magnification and a measuring scale are used for the
estimation of linear dimensions of a stone. When a diamond
is examined with a loupe, it is important to provide a proper
position of a stone held with tweezers relative the light
source and the "loupe eye". The light source is set
opposite the eye above the table approximately at or slightly
below the eye level and is orientated so that the direct light
falls on the stone but does not strike the eye. The loupe
is fixed by the right hand at the right eye, with its frame
touching the eyebrow. A stone is held with tweezers at a distance
of about 5 cm in front of the loupe, so that the specimen
is in focus and in the center of the field of vision. Both
hands should be in a contact with each other to avoid trembling
of the loupe or stone. The elbows may be placed on the table.
|
|
Lamp |
Standard white light source without predominance of the blue or yellow tint is required for diamond grading. The lamps manufactured by Dazor or Eickhorst ("Dialite UV", "Colorscope"), and others with a standard color temperature
5500-6500K (D55-D65)are commonly used. Some lamps contain inner ultraviolet sources.
A diamond is held directly beneath the lamp near the light-shade boundary.
|
|
Standard white background |
Standard white paper sheets of various size, sometimes folded to the U-shape, are used for precision color grading of diamonds. Gray background without blue or yellow tint is tolerable.
|
|
Ultraviolet lamp |
An ultraviolet (UV) lamp is used to check the luminescent properties of the sample under study (fluorescence and phosphorescence).
There are two operation modes of a UV lamp:
- long-wavelength mode, when the wavelength of the radiation emitted by the lamp is 365 nm;
- short-wavelength mode, when the wavelength is 254 nm.
It is better to work with a UV lamp in a dark room or after screening foreign illumination sources (this is especially important when studying phosphorescence). The color and intensity of the luminescence of the sample are estimated by sight. Sometimes special etalons of luminescence intensity are used.
Recommended procedure for working with a UV lamp:
- CAUTION: Avoid shining the radiation of the lamp into your eyes and long exposures of the skin.
- Carefully clean the studied sample before starting the test.
- Put the sample by tweezers into the appropriate chamber of the lamp.
- Switch on the lamp in its long-wavelength mode (365 nm).
- Watch whether the sample shows fluorescence or not. If it does, pay attention to the color and intensity of the fluorescence as well as to its distribution in the bulk of the stone.
- Switch off the lamp.
- Watch whether the sample shows phosphorescence or not. If it does, pay attention to the color, intensity, and duration of the phosphorescence as well as to its distribution in the bulk of the stone.
- Switch on the lamp in its short-wavelength mode (254 nm) and repeat the fluorescence and phosphorescence tests in the same way as for the 365 nm radiation.
|
|
Leveridge gauge |
 This device designed for the measurement of linear dimensions of gemstones, including mounted stones, is often called "Leveridge" for the name of its inventor. It may also be called gauge or estimator. This device has a measuring limit of 23.5 mm and is accurate to one tenth or one hundredth of a millimeter. Electronic and mechanic Leveridge gauges are produced.
When the Leveridge gauge is used, sharp clicks on a stone must be avoided, since they can result in chipping off the culet. For more see "Leverige usage".
|
|
Gemological microscope |
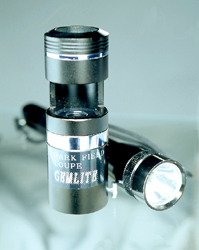
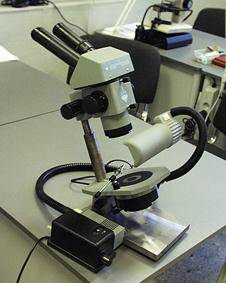 A microscope is used to examine internal and surface characteristics of gemstones under magnification. The most common device is a gemological binocular microscope that allows one to observe a 3D image of a stone with changeable magnification. Such a microscope is usually equipped with special accessories to provide the following illumination options:
- dark field illumination - for revealing internal characteristics of the stone;
- direct illumination (viewing the sample in reflected light) - for examining the stone surface;
- fiber-optic illumination - for examining both the internal and surface characteristics in more detail.
When a stone is examined under the microscope, it can be held with tweezers or with a special holder. The holders can be spring-type and vacuum-type. Depending on the microscope design, the magnification can be varied either continuously (ZOOM system) or in steps (drum). The maximum magnification factor of such a microscope usually ranges from 40x to 50x. A HRD gemological microscope has a graticule in its eyepiece, which allows the observer to determine the size of inclusions.
Recommended procedure for working with a microscope:
- Carefully clean the studied sample before starting the observation.
- Turn on the appropriate illumination.
- Start studying the sample with a relatively small magnification, such as 10x. When continuing the study, you may increase the magnification factor to examine the observed diagnostic features in more detail
- Hold the sample with tweezers or a stone-holder by the girdle so that to hide the minimum possible portion of the stone and to leave most of the stone for viewing.
- Bring the held stone into the viewfield of the microscope and focus it onto the stone (place the examined sample preferably closer to the illumination aperture in order to maximize the light power incident on bottom facets of the sample).
- Systematically observe the stone with the aim of looking for its diagnostic features:
- view the stone through its table perpendicularly to the table surface, using 10x magnification. Due to relatively small depth of focus, if you focus on the culet, an inclusion located right under the table will be out of focus and therefore will be blurred or even invisible. So, it is important to test the stone plane by plane, gradually changing the focus. At the same time, it better to slightly swing the held stone in order to change the angle of incidence of light on it;
- behind the table, there are star facets adjacent to it. View all the star facets one by one, trying not to rotate the stone much. Observe the next row of 8 main facets (bezel facets) in the same way. Then, view 16 upper girdle facets adjacent to the girdle in a similar manner;
- to examine a diamond from the pavilion side, rotate the stone together with the holder by 180� around a horizontal axis so as to make it possible to systematically study the pavilion mains and lower girdle facets and to figure out their diagnostic features
;
| The sample survey order
|
|
 |
- to view those regions previously hidden by the holder, remove the stone from the holder, rotate it by 90�, and fix it in the holder again;
- to view the diamond "laterally", take it by the table and culet with tweezers.
- To observe the stone in more detail, use a flexible light guide at larger magnification.
- Study the sample thoroughly, changing the position of the holder and the orientation of the stone in it.
- The following tests may help you to distinguish between internal and surface defects:
- View the sample in reflected light: adjust the stone orientation so as to make its surface reflect the incident light. A surface defect will look like a protrusion. An internal defect will look like a flat specular reflection.
- Focus on the defect using a larger magnification. If both the defect and the stone surface are simultaneously in focus, the defect is most likely of the surface type.
- When swinging the stone back and forth, the degree of distortion of an internal defect differs from that of a surface defect.
|
|
Refractometer |
The refractometer is an instrument used to measure the refractive index of the sample to identify 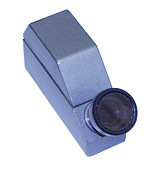 and allows one to distinguish between diamonds and imitations. This device is capable of measuring refractive indices not exceeding 1.81. and allows one to distinguish between diamonds and imitations. This device is capable of measuring refractive indices not exceeding 1.81.
The main functional units of the refractometer is a glass stage for positioning the sample, an aperture for external illumination, and a scale supplemented with an eyepiece and a polarization filter.
To measure the refractive index of the sample, an immersion liquid with a refractive index of 1.81 should be also used. This liquid contains methylene iodide and sulfur. Therefore, it can be dangerous if improperly handled. It is recommended to use surgical gloves when working with the immersion liquid and to wash hands after the work. Work with the immersion liquid in a well-ventilated room and tightly close the vial containing the liquid.
When working with the refractometer, it is better to put the stone on the glass stage and remove it from there manually, because the stage is soft enough to let tweezers easily scratch its surface.
If evaporation of the immersion liquid leads to formation of sulfur crystals on the surface of the glass table, remove these by pouring some more immersion liquid (or pure methylene iodide) on the surface. Never try to remove the sulfur crystals from a dry surface, this may scratch the table. If the stone sticks to the glass table, dissolve the sulfur crystals that cement the sample by a large amount of the immersion liquid or pure methylene iodide.
The accuracy of the refractive index measurement depends on the following factors:
- stone polishing quality;
- flatness degree of the bottom facet of the stone;
- size of this facet;
- pollution degree of this facet;
- state of the glass stage.
Recommended procedure for working with refractometer:
- Carefully clean the studied sample before starting the measurement.
- Turn on an external illumination lamp and direct its light into the appropriate aperture of the refractometer.
- Pour a drop of the immersion liquid onto the glass stage of the refractometer.
- Carefully put the sample to identify on the glass stage so as to have a thin layer of the immersion liquid between the stage and the sample.
- Close the hood of the device.
- Watch the refractive index value on the scale through the eyepiece of the refractometer.
- Open the hood of the device and carefully rotate the sample by approximately 45�.
- After each rotation watch the refractive index value while keeping the hood shut.
- Upon the rotation you may see either a bright and a dark portion of the scale with a stable boundary between these, a bright and a dark portion of the scale with a moving boundary, or an entirely bright scale. In the case when both the bright and dark portions are observable, the refractive index of the sample is less than 1.81. If the whole scale is bright, the refractive index is 1.81 or larger.
- Repeat the measurement a few times with largest facets of the stone.
|
|
Balance |
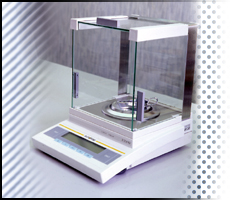 To weigh gemstones, special balances are used (1st or 2nd precision category is required). The mass of a diamond is measured in carats (ct) with an accuracy of one hundredth. The third decimal digit is omitted, unless it is 9. In the latter case, the mass is rounded up. Balances manufactured by Mettler of Sartorius are commonly used. To estimate the mass of a gem, it is possible to use a portable electronic balance with a carat scale or even pharmaceutical scales. If it is not possible to separate a mounted diamond from its mounting, the mass of the stone is estimated by means of special formulas.
To measure the specific gravity of a gemstone, a gemological balance with hydrostatic weighing option is used. The following formula determines the stone specific gravity:
Specific gravity of a stone = Weight of stone in air/(Weight of stone in air - Weight of stone in water)
|
|
Duotester |
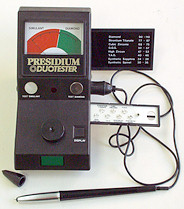 The duotester is a device used to identify the sample under study by measuring its heat conductivity and/or reflectivity and therefore to distinguish between diamonds and imitations, including those made of moissanite.
There are a scale and a pointer on the front panel of a duotester. The scale is split into two fields (red and green) labeled as Simulant (imitation) and Diamond, respectively. When identifying a stone on the basis of its heat conductivity, the pointer points at one of these fields. The device is also equipped with a special needle mounted into a holder. This needle is capable of making the necessary measurements.
The reflectivity test requires that the surface of the studied stone be flat, perfectly polished, and clean. In practice, it is not always possible to find such a surface. As a result, the measured value of the stone reflectivity may appear to be understated. To measure the reflectivity, the duotester is equipped with a stage, a display, and a button. There is an aperture in the center of the stage, where the studied sample should be placed. The device is supplied with a drawout table containing the reflectivities of diamond and imitations (in relative units) and with a set of samples of synthetic imitations.
Recommended procedure for heat conductivity-based identification:
- CAUTION: Handle the needle with care. When discontinuing the measurements, always put a protective cap on the needle.
- Connect the holder and the needle to the duotester through a special socket.
- Switch on the device by pressing the ON-OFF button and wait for 20 seconds. A red lamp should light up.
- Remove the protective cap from the needle holder.
- Take the holder and press the needle in perpendicular to the metal disk attached to the duotester case, which is labeled as TEST DIAMOND, until the needle becomes entirely recessed into the holder. If the device operates properly, the pointer should move to the green portion of the scale.
- Press the needle in perpendicular to the synthetic sapphire disk attached to the duotester case, which is labeled as TEST SIMULANT, until the needle becomes entirely recessed into the holder. If the device operates properly, the pointer remains within the red portion of the scale.
- The device is now ready to measure the heat conductivity of the sample under study.
- Carefully clean the sample before starting the measurement.
- Hold the sample with tweezers or put it into a special hole in the front panel of the device.
- Press the needle exactly in perpendicular to the table (or another large facet) of the sample under study, held with tweezers or placed into the special hole.
- The pointer will leave its initial position to reach one of the two fields of the duotester scale. If it points at the green field, the sample under study is made of either diamond or moissanite. If the pointer stops within the red field, the studied sample is a non-moissanite imitation. When the needle touches tweezers or another metal object, the duotester beeps. In such a case, you need to redo the measurement, avoiding contacts between the needle and metal objects.
- Wait for 10 seconds before starting the next test.
Recommended procedure for reflectivity-based identification:
- Carefully clean the sample before starting the measurement.
- Press the DISPLAY button.
- Make sure that the display shows "00".
- Remove the protective cap from the measurement stage.
- Put the studied sample on the stage so that its table (or another large facet chosen for the measurement) is bottom. Cover the sample with an opaque cap.
- Press the DISPLAY button on the duotester case. The number corresponding to the reflectivity of the sample will appear on the display. Wait until this number remains unchanged for about 2 seconds. Memorize or write down the number.
- Compare the measured reflectivity with the table supplied.
- If the measured reflectivity corresponds to a boundary value of the table, clean both the stone and the duotester stage and redo the reflectivity measurement with the same facet of the stone, while having slightly changed its position (having moved the stone farther from the center of the stage).
- CAUTION: To prevent dust from depositing on the measurement stage, always cover the stage with the protective cap when the measurement is over.
|
|
Polariscope |
 The polariscope is a device used to determine the optic character (singly refractive or doubly refractive) of the sample to identify and allow one to distinguish between diamonds and imitations and to reveal natural/synthetic origin of diamonds.
A polariscope comprises two parallel rotatable polarization filters (the upper one serves as an analyzer, the lower one - as a polarizer), a rotatable glass stage for placing the studied sample, and an illumination lamp. The stage is sandwiched between the filters. Some polariscope models are additionally equipped with a lens needed to observe a conoscopic pattern. The observation of the optic character of the sample should be performed in a darkened room or after screening foreign illumination sources.
Recommended procedure for working with a polariscope:
- Carefully clean the studied sample before starting the measurement.
- Shift the lens aside.
- Adjust the distance between the filters to make it fit the sample under study.
- Turn on the illumination.
- By rotating the upper filter (analyzer), make it crossed with respect to the lower one (polarizer). In this case, the field viewed through the analyzer looks as dark as possible.
- Put the sample between the crossed polarization filters on the glass stage and rotate it by 360� around the axis of the device, observing the sample through the analyzer. Repeat the observation a few times, changing the stone orientation every time.
- Determine the optic character of the sample:
- If the stone remains dark while being rotated, it is singly refractive.
- If the stone periodically becomes darker and brighter (4 times) during one 360� rotation, it is doubly refractive. This is true even if the effect takes place for a single orientation of the sample.
- The sample may also show anomalous birefringence (manifested as appearance of curved fringes, "iron cross" effect, dashes, or any other pattern consisting of brighter and darker areas).
|
|
Proportionscope |
This device is used to determine the diamond proportions and evaluate the cut parameters of the stone by comparing its projection to the schematic image of the ideal diamond. Proportionscope enables the measurement of crown and pavilion angles, table size, crown height, pavilion depth, girdle thickness, and the deviation of the diamond shape from round.
|
|
Set of color masterstones. |
A set of masterstones is recommended for determination of diamond color. The masterstones are previously calibrated against initial masterstones and their colors are measured with a photometer. Diamond masterstones are preferable, although CZ masterstones may also be used. The masterstones in a set should be similar in size; those with a diameter of 6.5 mm (as 1-ct diamond) or 5.2 mm (as 0.5-ct diamond) are most commonly used.
Grading of colored diamonds requires special masterstones. If these are not available, color charts (Munsell color tables) are used.
|
|
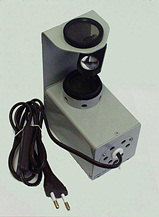
Diamond-detector |
This device makes it possible to differentiate diamonds from their imitations by measuring the heat conductivity of a specimen. Some devices measure reflective ability or both parameters (duotesters). There are digital and indicator detectors; the latter type is more preferable. The detector enables an expert to set diamond apart from all its imitations, except moissanite.
|
|
Magnet |
A magnet is used to check the magnetic properties of the sample under study. The stronger the magnet, the weaker magnetic properties of the stone you will be able to reveal.
Recommended procedure for working with a magnet:
- Take a sheet of paper and a magnet.
- Carefully clean the studied sample before starting the test.
- Put the sample on the paper sheet.
- Raise the sheet together with the sample and hold it as horizontally and stably as possible (avoid sheet trembling).
- Bring the magnet to the paper sheet from below (hold the magnet right below the sample).
- Move the magnet back and forth in a plane parallel to the sheet plane.
- Watch the response of the sample:
- If the stone remains motionless, it is non-magnetic;
- If the stone follows the motion of the magnet, it is magnetic. Depending on the strength of its response, the magnetic properties of the stone can be classified as very week, week, moderate, strong, and very strong.
|
|
Using laboratory methods of material characterization |
Laboratory methods of material characterization include optical spectroscopy of ultraviolet, visible, and infrared regions, luminescence spectroscopy, color and spectral cathodoluminescence, Raman spectroscopy, spectroscopy of electron paramagnetic resonance, and microprobe analysis. These methods are widely used to distinguish between real diamonds and imitations, to reveal the natural or synthetic origin of a stone, and to detect treated diamonds.
|
|
|